Release Notes: New Features and Tools
Published: September 13, 2022

The FreeOnlineSuvreys development team has been working hard to add new features and improve existing tools in the app. We’re exited to be able to share all of this with you!
New features
Let’s get started with the new additions to the app.
Contact management tools
We’ve introduced some CRM capabilities to the app, which you can get started with for free. Whilst you could previously upload contacts and send email invitations to them, the functionality of this tool was fairly limited.
Now we’ve expanded on this feature, you can do some much more:
Group contacts
After uploading contacts, you can organize them into groups based on the types of campaigns you intend to send them. The most beneficial aspect of this new feature is the ability to assign a lawful basis for processing to any group you create, enabling you to track your compliance.
Here’s a list of the lawful basis for processing you can assign:
Explicit Consent
-
Legitimate interests
-
Contract
-
Legal obligation
-
Vital Interests
-
Public task
Assigning a lawful basis of processing data for these contact groups is mandatory, but doing so will ensure you’re activities are compliant.
Segment contacts
You can filter your contacts and groups based on a plethora of rules to create unique segments. Some of these filter rules include:
-
Groups
-
Unsubscribed
-
Source (how the contact was imported)
-
Sign up date
-
Email Invitation camapigns
-
Email metrics
-
Responses to survey questions
-
Survey completion, response date, and country
Creating segments will not remove contacts from groups, but allows you to identify people by a qualifying piece of information. For example, if you’ve run a Net Promoter Score survey, you could create contact segments for your Promoters, Passives, and Detractors.
Custom fields
Custom fields enable you to add more information about your contacts, which can be entered manually when you import contacts. However, you’ll also be able to pass information from survey responses to fill custom fields dynamically.
For example, if you’ve set a job/ role custom field for your respondents, they will be able to confirm or update this when responding to a linked question.
What’s more is that you can pass any information from custom fields back into surveys using merge tags, making personalization of surveys as easy as pie!
Of course, we generate a few custom fields for you to get you started. These include:
-
Email address
-
First name
-
Last name
-
Phone number
-
Company
-
Address Line 1
-
Address Line 2
-
Zip/ Postcode
-
City/ Town
-
State/ Province
-
Country
Again, these can be updated manually via the contact profile and dynamically via form fields.
What’s more is that you can pass any information from custom fields back into surveys using merge tags, making personalization of surveys as easy as pie!
Contact profiles
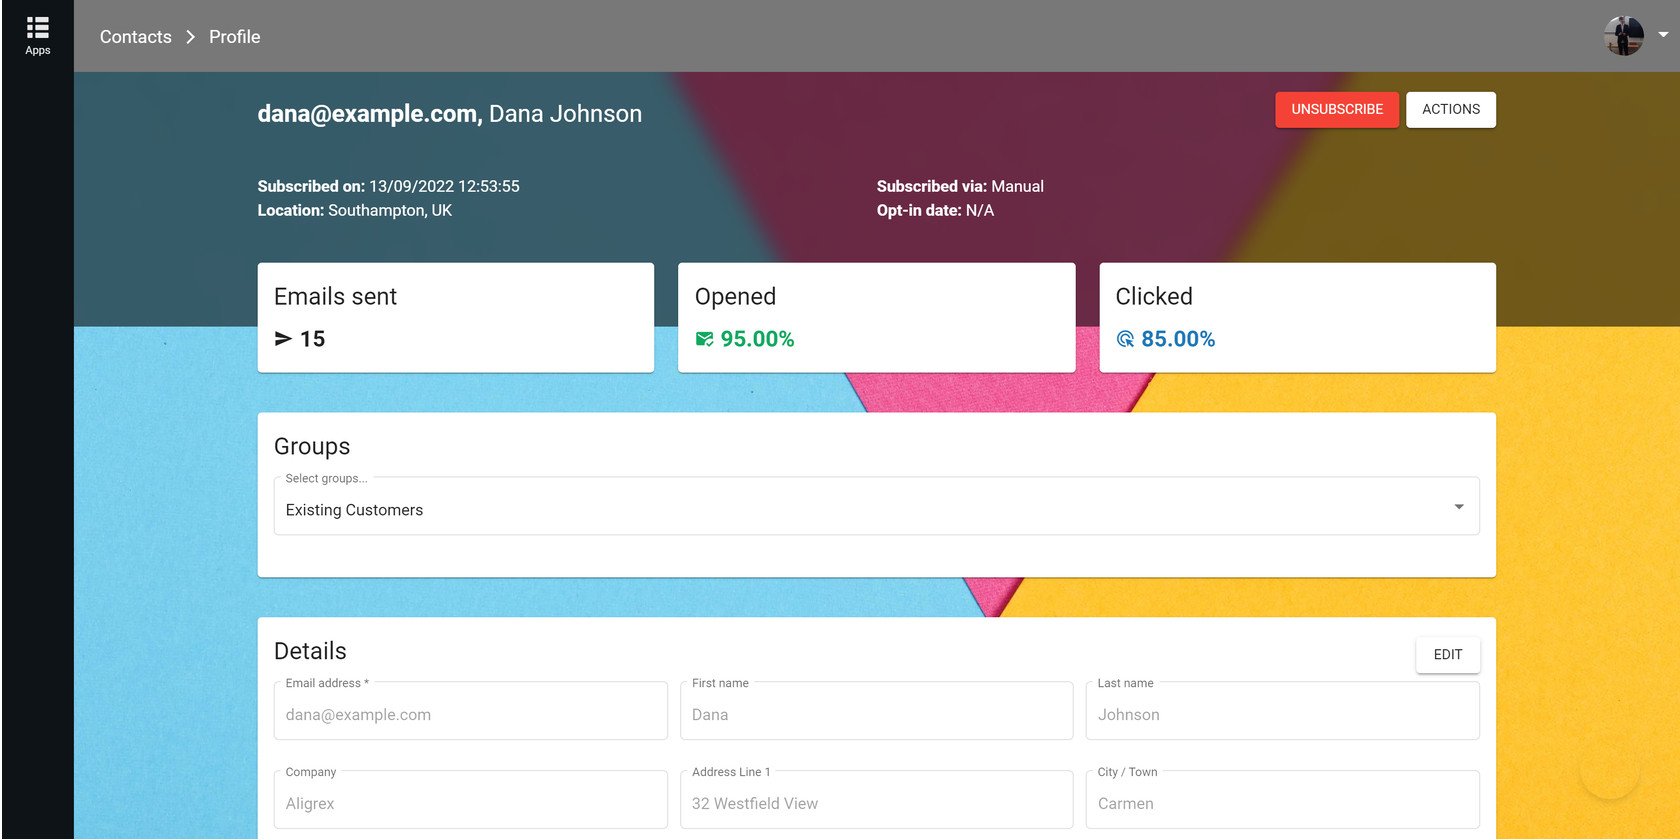
Each contact you store in the app will have its own profile associated with it, these are contact profiles. Here you’ll find the following information:
-
Average open-rate
-
Average click-rate
-
Total emails sent
-
Groups
-
Personal information
-
Custom fields
-
Activity log
The activity log will contain events pertaining to:
-
Email invitations
-
Email opens
-
Email clicks
-
Survey responses (tracked only)
Email builder
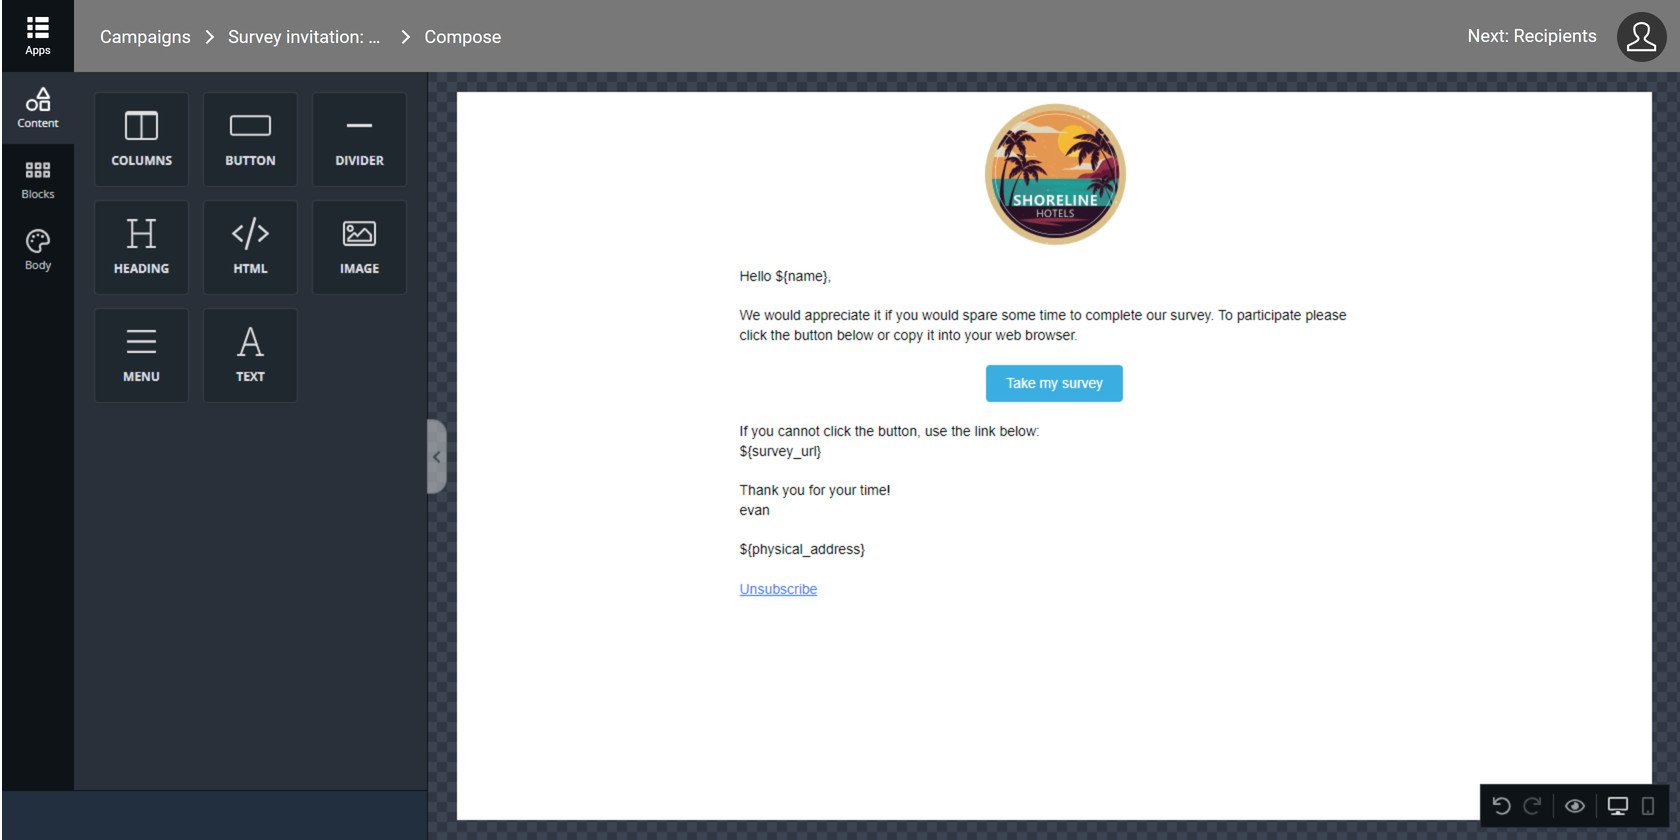
Now comes one of the best additions to the app, our email builder. You can nowcraft beautiful email invitations for your surveys.
Fully customize the design of emails, add your logo and branding, and use merge tags to pas information from custom fields and personalize email content.
Previewing emails
You’ll also be able to preview your email invitations for desktops, tablets and mobiles. Whilst our email tool has been integrated to display your emails perfectly on any devices, it’s best practice to check your images and other content appears correctly for each.
Hide content based on device
In the case that your content isn’t displaying correctly on certain devices, you’ll have the option to hide that block for those devices.
This means you don’t have to spend a time editing an image, for example, to get it to work on all devices. Instead, upload to versions and hide them for the appropriate devices.
Email statistics and metrics
If you share your survey via email invitations, you’ll find all the associated email metrics right along side your survey data. This will include:
-
Open-rate
-
Click-rate
-
Total emails sent
You’ll be able to jump straight into your email report from your survey report. And if you send multiple invitation campaigns for a single survey, you’ll be able to access them all from the report of the shared survey.
Filter survey results based on email metrics
We’ve added a host of new filters for you to break down your results into digestible chunks. Many of these new filters allow you to filter and compare sets of data based on the email metrics discussed in these release notes.
You can also apply filters based on your contacts, the groups they belong to, and the information you’ve stored about them.
So for instance, you could compare the survey results of one contact group against another.
Collect contacts with forms, surveys, and quizzes
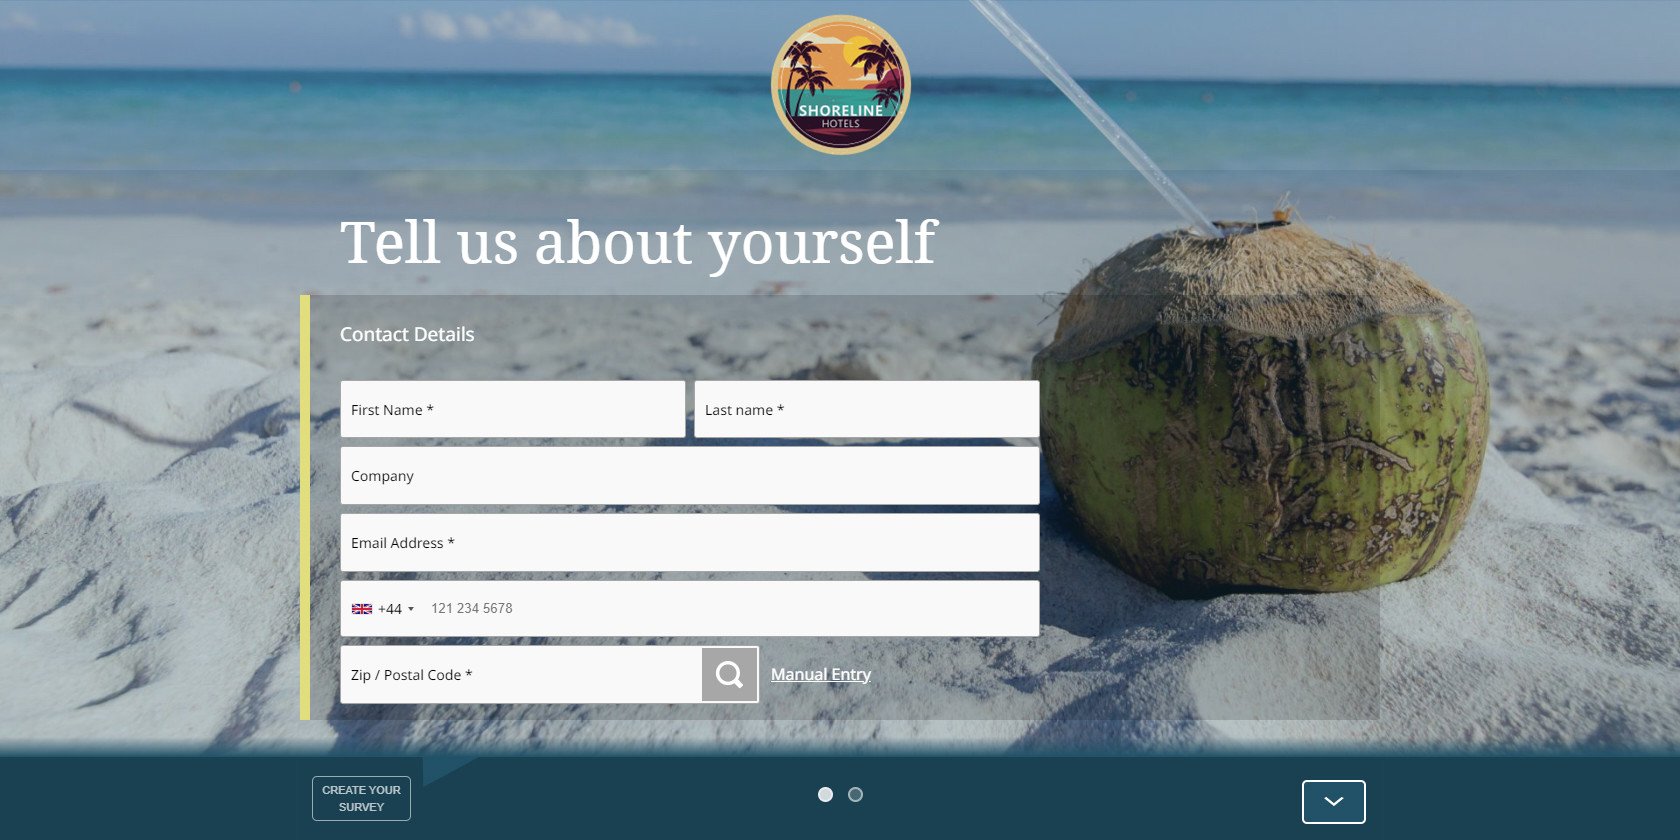
You’re now able to collect contacts with a form in your survey. To do this, add a contact form or any other text based field to the projects you create on FreeOnlineSurveys and select a group to add new contacts to.
If a contact already exists in the group you’re attempting to add them to, we’ll simply update the existing information instead of adding a duplicate contact.
If you’re using a form to add contacts toa group assigned the Explicit Consent lawful basis for processing data, we’ll add a consent question beneath the form automatically.
Only those who give consent will be added to those groups, ensuring your as compliant as possible. We’ll also record and track any consent given for you.
Binary Yes/No question type

Our new Binary question type asks respondents to select between two answers. For example:
-
Yes / No
-
True / False
-
Good / Bad
You’ll be able to switch between three icon sets we’ve created specifically for these questions.
We have more than 20 question types and fields available to you on FreeOnlineSurveys, making survey creation a breeze!
New survey builder
You’ll also notice that we’ve made some enhancements to the survey builder, most notably the introduction of the Form tab and the new home for question settings.
Form Tab
To help you streamline your survey building, we’ve consolidated many of the associated features under the new Form tab.
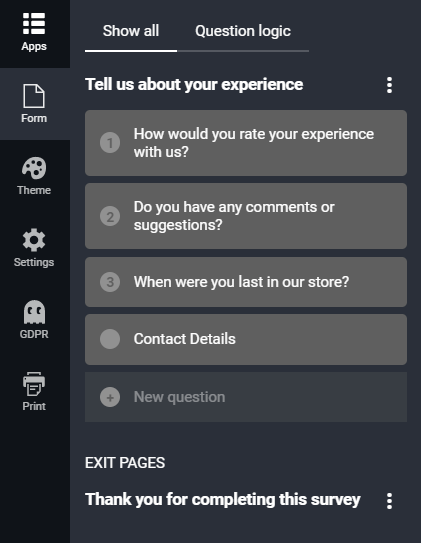
From this tab you can manage the following:
-
Insert question and form fields
-
Add question and exit pages
-
Apply question logic
-
Set page logic
We’ll go into more detail in the following sections, specifically how to achieve the above in the Form tab.
What’s changed?
Let’s get into how some of the processes for building surveys may have changed with this new update.
Adding questions

You no longer need to drag-and-drop questions into your surveys, forms, and quizzes. Instead, all you need to do is:
-
Go to the Form tab
-
Click ‘+ New question’
-
Select a question type from the library
Your new question will be added at the bottom of the page you have open in the builder. We have a great help doc if you want to learn more about adding survey questions.
Moving and reordering questions
As with the above, question order is now also controlled in the Form tab.
To move and reorder questions on the same page, simply:
-
Go to the Form tab
-
Hover over the question you want to move
-
Left-click and hold the ⋮⋮ icon
-
Drag the question to a new place
To move questions to a different survey page:
-
Go to the Form tab
-
Hover over the question you want to move
-
Left-click and hold the ⋮ icon next to the question title
-
Select ‘Move to page’
-
Choose a page from the dropdown
Your question will then be moved to the bottom of this new survey page. You can also drag questions from one page directly onto another.
Deleting questions
To delete questions from your survey:
-
Go to the Form tab
-
Hover over the question you want to delete
-
Left-click and hold the ⋮ icon next to the question title
-
Select ‘Copy’
This will create a duplicate of the question below the original. The duplicate will contain all the answer options, settings, and formatting of the original.
Copying questions
To duplicate a question in your survey:
-
Go to the Form tab
-
Hover over the question you want to copy
-
Left-click and hold the x icon
-
Select ‘Delete this item’
Your question will be deleted from your survey.
It’s important to note that this cannot be undone. Once a question is deleted, it can’t be restored.
Applying points to questions (Quizzes only)
Applying points to quiz answers was previously a little hidden away, so we’ve increased the visibility of this feature.
There is a little variation in how points are applied to single-select and multi-select questions, so we’ll go over that too!
Applying points to single-select question types
Applying points to quiz answers was previously a little hidden away, so we’ve increased the visibility of this feature.
To apply points to single-select quiz questions:
-
Click an answer option in the builder
-
Enter a number into the ‘Points’ field
It’s as simple as that.
Applying points to multi-select question types
Instead of entering a number beneath answers for multi-select question types, you’ll instead mark answers as correct.
To apply points to multi-select quiz questions:
-
Click an answer option in the builder
-
Tick the ‘Correct’ box
But, you can go a little further in how much these correct answers are worth in terms of points and how many correct answers quiz takers must select to be awarded those points.
In the questions setting bar that appears at the bottom of the page, you’ll find options for the ‘Marking scheme’ of a question.
Here you can set the number of points awarded for correct answers, and whether they receive those points for ‘matching all correct answers’ or ‘each correct answer.
Adding survey pages
To add a new page to your survey:
-
Go to the Form tab
-
Left-click and hold the ⋮ icon next to the page title
-
Select ‘Add page’
-
Select ‘Question page’ or ‘Exit page’
Question pages are where all your survey questions are displayed.
Exit Pages can be used for a variety of purposes, including: thanking respondents, disqualifying participants, redirecting people to an external page, or displaying quiz scores.
Changing exit page type
To change the exit page type for your survey:
-
Go to the Form tab
-
Left-click the title of your exit page
-
Open the ‘Exit page type’ drop-down
-
Select an exit page type
You can have multiple exit pages for your project, but you’ll want to be aware of where respondents are being sent upon completion. You can manage this with Question Logic and Page Logic.
Managing logic
To optimize where some of our features are displayed, you now control question logic and page logic via the Form tab.
Adding question logic
Question Logic allows you to send respondents to different pages based on their answer selections. this feature triggers when respondents click the ‘Next Page’ button.
To apply page logic:
-
Go to the Form tab
-
Hover over a question
-
Left-click and hold the ⋮⋮ icon next to the question text
-
Select ‘Logic’
-
Use the drop-downs below each answer option to set where respondents are sent
Question Logic will always override Page Logic, which we’ll go into more detail on below.
Adding page logic
Page logic determines which page respondents are sent to upon clicking ‘Next Page’ if they have no selected any answers with question logic applied.
By default, respondents will always be sent to the next page chronologically. Page Logic allows you to customize this.
To apply page logic:
-
Go to the Form tab
-
Left-click and hold the ⋮ icon next to the page title
-
Select ‘Show page skip logic’
-
Open the page logic drop-down and select a page
As with question logic, you can only send respondents forward. It’s not possible to send respondents back to a previous page.
Customizing question settings
Before this update, most question settings where hidden away in a wheel that appeared only when hovering over a question.
We’ve increased the visibility of these robust options by having a settings bar appear any time you’re editing a question in the builder or the Form tab.